

How To Repair Wet Plaster Walls
Plaster repair is ordinarily within the capabilities of a competent DIYer. So if you are renovating an quondam home, spotting the signs and knowing the remedies is essential. And if you notice that the damage needs repair beyond your skills, it is notwithstanding important to know what is required.
Original plaster finishes on internal walls and ceilings are worth treating with care. Unlike the smooth, lifeless and hard cementitious and gypsum plasters mutual today, sometime plasters tend to accept a textural undulating quality, offer flexibility and, most important of all, allow the wall to breathe, enabling moisture to disperse. Therefore, maintaining these qualities is a very important role of a well-managed house renovation.
Fortunately plasterwork is easily repaired just, although plastering may await easy, it'southward a highly skilled job so it'due south always best to call in a plasterer with experience of sometime buildings. To discover the almost appropriate materials for the job, seek communication from specialist suppliers.
Plaster deterioration warning signs
Being able to spot the signs of damage is a must-take skill for anyone who lives in an erstwhile home. Early detection means the trouble is easier to prepare before it gets also bad.
Plaster is likely to be damaged past move or the results of external factors like impact or damp. Over time, plaster may delaminate or get detached from the surface beneath.
In the case of stud walls and ceilings, timber laths are stock-still between the studs or joists and the plaster is pushed through the gaps between the laths. Rotten laths can result in plaster sagging or bowing.
- DIY: Brand plastering walls an easy job with our guide.
What to wait for:
- Inappropriate mod plasters and finishes
- Cracks and bulges
- Loose plaster
- Plaster that sounds hollow when tapped
- Sagging ceilings
- Underlying structural problems
- Damp patches and staining
Repairing cracks and bulges in plaster
Some cracks and bulges in plaster may exist superficial or localised; others effect from failure of the masonry or timber below, or may indicate wider structural bug within the edifice.
Action:
- Rake out thin cracks and fill with a good filler.
- Investigate bulges or anything larger than a hairline scissure.
- Monitor cracks over a menstruum of time by marking and dating their terminate indicate on the wall.
- Consult a structural engineer if in any doubt.
- Brand necessary repairs with advisable traditional materials.
- Cracks and pockmarks may be filled using matching plaster, or narrow ones with proprietary interior filler gauged with whiting.
- To patch repair plasterwork , slightly treat the exposed edges of the existing plaster with h2o or diluted PVA (one office to ten of water) to control suction and foreclose cracking. Alternatively, gypsum may sometimes exist added to a lime plaster mix for the same purpose.
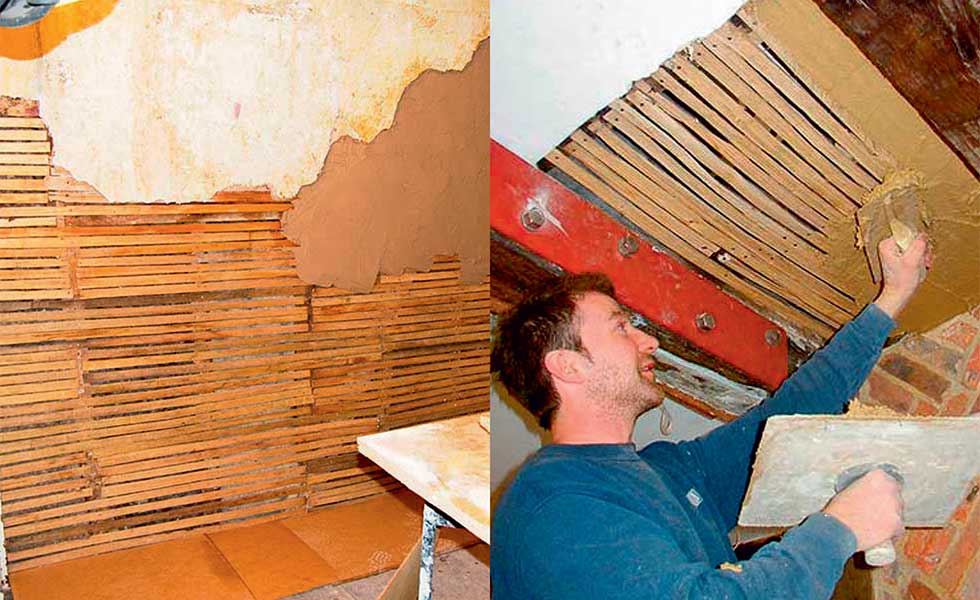
Major repairs underway to a lath and plaster wall; plastering laths on the ceiling is usually fairly straightforward
Reattaching loose plaster
Where an area of plaster has become discrete from masonry it can sound hollow when tapped. If information technology has lost its fundamental to laths, information technology may feel springy. In both cases the plaster might remain intact every bit haired lime plaster is generally strong and acts as a sheet, even if areas have parted company with the wall itself.
Conservators use specialist methods to reattach loose plaster or delaminating layers, especially where of historic value, and so if in doubt bring in an skillful.
Activity:
- Test plaster past tapping and prodding.
- Effort to secure the plaster using stainless-steel screws and large washers.
- Cut away defective plaster and investigate.
- Where laths take failed, cut dorsum to studs or joists and supersede.
- Use like-for-like materials to repair whatever damage.
- Plaster that matches the existing material is preferable where repairs will exist limewashed.
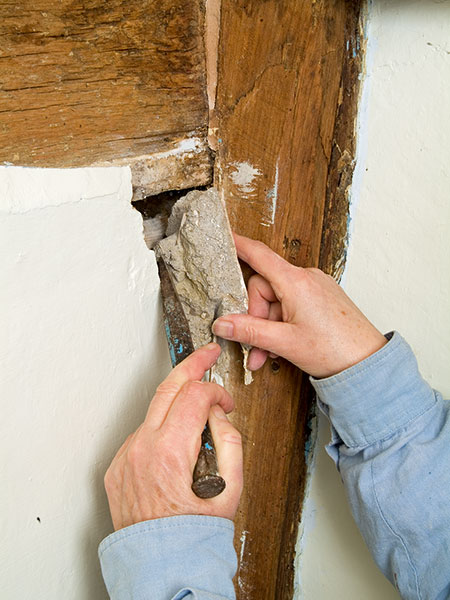
Removing a loose section of old lime plaster
Mending sagging or cracked ceilings
Problems with ceilings frequently result from the plaster bail having failed, structural move, failure of joists, damp problems and rotten or beetle-infested laths.
Activeness:
- Investigate from in a higher place if access is bachelor from a loft or by carefully lifting floorboards.
- Resolve structural issues to joists.
- Always use screws for any fixings to avoid vibrations to frail ceilings.
- Where the bond with laths has failed, reinforce by pouring fresh plaster from above and strengthening with a jute scrim set into this and secured to the joists.
Stripping plaster surfaces
Wallpapers, paints and other finishes can spoil the appearance of plaster surfaces and may trap moisture. When removing, keep with care and exist aware that wallpaper may be acting as a back up to defective plaster underneath.
Action:
- Ever undertake a test start on a pocket-size unobtrusive expanse.
- Gently employ a scraper simply avoid scoring through the surface into the plaster.
- Apply warm water or proprietary wallpaper stripper with a sponge or castor.
- Use a steam stripper to remove stubborn coatings, being conscientious not to permit steam to penetrate the plaster.
Treating damp and staining
Unlike modern plasters, lime plasters that have become wet generally dry out out with their integrity intact so need not exist removed.
Where damp is present, salts may pose a problem. If these continue to come to the surface, plaster may have to be stripped.
Soot staining from flues can oft be seen on the surface above a fireplace.
Activeness:
- Always care for the cause of any clammy problems, not the symptoms.
- Ensure the wall has been allowed to dry out out fully before applying plaster.
- Where staining appears through a chimney chest it may be necessary to replaster.
- If you decide to replaster stained areas, when the problem is not severe information technology is sometimes suggested to use a slurry of cow dung painted on to the masonry before applying new lime plaster.
- If staining continues to persist, consider 'dry lining' by fixing battens to the wall and applying laths and lime plaster.
Traditional plaster coats
Often referred to as a 'scratch' coat, the kickoff plaster coat creates a reasonably flat surface and is 'scratched' in a diamond design to provide a cardinal for the next coat.
For good-quality piece of work, a 'floating glaze' or a 'straightening coat' is practical next and is worked until perfectly level. This in turn is scratched and and then a sparse 'setting' or 'skimming coat' is used to create a polish surface.
Repairing decorative plasterwork
Where decorative plasterwork, such as cornicing, is damaged repairs can ordinarily be undertaken by a skilled plasterer.
Early plasterwork was 'run' in situ using a template and running information technology around the peak of the wall over moisture plaster to create the profile of the cornice.
Later details were formed using gristly plasterwork. These incorporated a hessian scrim that strengthened the back and were formed in flexible moulds.
Plasterwork item is often obscured under pigment layers but accept groovy care when attempting to strip these areas.
Warm h2o, steam, chemical removers, poultice systems and proprietary wallpaper stripper may all be successful in removing paint from plasterwork merely always undertake a exam first on a small unobtrusive area.
A toothbrush and a sharpened stick are useful tools, but be conscientious to avoid any accidental digging with scrapers.
Additional words past Douglas Kent and Marianne Suhr
Source: https://www.realhomes.com/advice/fixing-problems-with-old-plaster
0 Response to "How To Repair Wet Plaster Walls"
Post a Comment